Wednesday, November 20, 2013

Gumpaste Vs. Sugarpaste

As you might know I teach cake decorating classes in one of the leading cooking schools in Israel. 
In my basic course the second meeting involves sculpting a woman. 

I׳ve been teaching this course for quite some time and I always use Gumpaste for sculpting, just as I do for my own cake figures and decorations.

 However, no matter how much I stress the superiority of Gumpaste over Sugarpaste, for sculpting, designing and delicate intricate work, I always get the same question from my students, can't I use Sugarpaste in another method or form?

Well for starters you can use whatever you want, but if you want a good looking figure, a delicate flower or intricate lace pieces, I truly recommend using Gumpaste. 

If you are not familiar with the difference between the two pastes, here is my explanation: 

I compare Sugarpaste to a farmer:  he works long and hard, he does rough tasks, that must be done properly but without too much attention to delicacy or design. 


Gumpaste is similar to a royal family member. They are very delicate, they wear lace and silks and diamonds. They are all about beauty and design. They want perfect accuracy and decorations. 

If you keep that in mind you can understand the difference between the two.

One of my wedding cakes,
the decor and couple are made of
gumpaste


Sugarpaste for cake covering and Gumpaste for decor and sculpting.


That is all good and dandy, but I do have one exception I tell my students: What if you want to sculpt or create sugar flowers, you don't have Gumpaste and you have no desire to go to the store, or you can't go because your snowed in or just too tired?


We'll this consists as an emergency in my book :) 
In this case you can add some Gum tragacanth, Taylose, or CMC. These are powders used to stiffen your paste while adding a stretch quality to it. 
Add 1-2 tea spoons of any one of these powders to your Sugarpaste , knead well and let sit for 30 minutes to 1 hour, prior to using.
The paste will be stiffer than regular Sugarpaste, thus fitting for basic design work. 
But, this paste will never have the same qualities Gumpaste has. 
That is why I recommend having Gumpaste or making your own. 

Here is A very good Gumpaste recipe I use for my sugar flowers:

Alan Dunn's Gumpaste recipe

5 tsp cold water,
2 tsp powdered gelatine,
18 oz confectioners' sugar (sifted)
3 tsp gum tragacanth
2 tsp liquid glucose,
3 tsp white vegetable fat plus an extra tsp to be added later
1 large fresh egg white 

Mix the water and gelatine in a small bowl and leave to stand for 30mins. Sift the icing sugar and gum tragacanth together into the bowl of your heavy duty mixer. 

Place the gelatine/water mix over a pan of hot water and stir till the gelatine has dissolved. 
Add the glucose and vegetable fat to the gelatine and water mixture and keep heating until everything has dissolved. Add this mixture to the icing sugar and egg white and start beating in the lowest speed then slowly turn the speed up to high till the paste is stringy and white. 
Take the paste from the bowl and knead together. Cover using the extra tsp of vegetable fat to stop it crusting and place in a plastic bag inside an airtight container. 
Let the paste rest for 12 hrs before using.
Keep in the fridge.

I'd love to see your cake designs!
if you send me good qulity photos i'll portray it in the blog!

Till next time, cake away!'

Sharon

Wednesday, November 13, 2013

sculpting with food

It is no secret that sculpting with gum paste, fondant or candy clay is sculpting with food. 

But these media all follow the same guidelines - kneading some of the material at hand then transforming it into a new object, from flowers to animals to people. 

I've been using these media for over 15 years, and I love working with them, but I'm always fascinated when I see other food used to create one of a kind sculptures. 

Such as cheese: 


http://www.toxel.com/inspiration/2009/10/13/15-amazing-cheese-sculptures/
Hey Bob!

http://www.toxel.com/inspiration/2009/10/13/15-amazing-cheese-sculptures/
:)

 
Butter: 


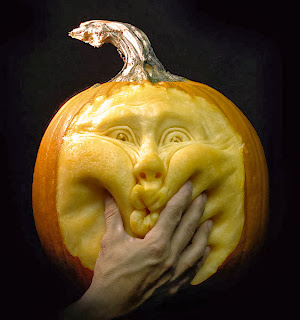
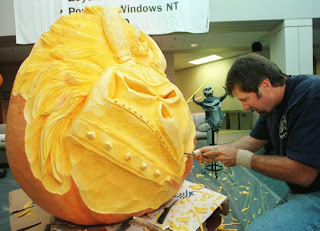
Pumpkin carving:


http://www.ibtimes.com/pumpkin-carving-patterns-here-are-few-ideas-708922
Soo cool!

http://www.ibtimes.com/pumpkin-carving-patterns-here-are-few-ideas-708922
artist at work

WOW


Or mosaic candy portraits:
http://www.delish.com/food-fun/food-art#slide-1
Guess who?


who Am I ?
I always admire this type of art work, because I find it much more challenging to create a figure by carving. You need to imagine each part of your subject and you can't go wrong. Or replace what you've already carved...
In art pictures created from candy, you have to spend quite some time arrainging the colors correctly with ready made pieces. That seems like a real hassle.


Yesterday I visited the 30th annual International Exhibition for Food and Beverage. 
I enjoyed it as in previous years, but it was the first time I had a chance to see up-close the work of a chef that is also a sculptor, Shimon Ben ami. He sculpts in Margarine! 


Mostly he had photos portraying his work, but I didn't take any of them due to their quility. However, he also had a great sculpture of Shimon Peres the Israeli President. 

In the following photo you can see the sculpture the sculptor and the photo of Shimon Peres. 

shimon & Shimon 


The resemblance is amazing. I really looked the way he handles the Margarine. He didn't smooth it as you would regularly see in other works created from Margarine or Butter, he gave it a rough look, similar to bronze sculptures. 
Do you sculpt in food other then the sugar collection?


Tuesday, November 5, 2013

How to fix a broken springform cake pan

About a month ago I hosted Rosh Hashanah at my house. 
Dinner went well, everyone enjoyed the meal, and we had a lovely time.  

Next, it was cake time! For this special occasion I baked a great honey spiced cake in one of my springform pans.  

If you don't know what I'm talking about, you should check them out. These pans are great for cakes and desserts that are prone to fall apart when removed from regular cake pans. The springform pans have a special feature: the rim loosens from the base of the pan when you open the clamp.  You can't imagine how useful this is. I regularly bake in these pans, remove the rim and display my cakes on a nice serving platter or cake stand, thus avoiding all the mess and possible problems involved in removing a cake from a cake pan. Finally, if you have cake leftovers, you can reattach the rim to the base, cover the pan with and replace it in your fridge. It's a really great feature!By the way, some of the pans come with two different bases, for use as a tube pan or a regular round cake pan.  

If you don't have a springform cake pan I recommend adding one to your kitchen for delicate cakes, such as chocolate mousse cakes and cheese cakes, or as I use them for . As I was pulling it out of the fridge, it hit the fridge door and got a small dent on the top of the pan. I was a little upset, because I really like that pan, but I didn't give it much thought. After I served the cake I had some cake left and was planning on closing the rim back, and placing the cake in the fridge. To my dismay the pan didn't lock itself when I closed the clamp! 

Lucky for me I have a very handy Dad that was happy to take the pan with the rest of the cake to fix it for me!  Lucky for you :) he took photos of the very simple and quick process in case your springform pan ceases to function.

So how do you fix a springform cake pan? 

In the photo below you can see my springform pan. The long silver handle is the clamp handle. When pressed all the way to the left, the rim is closed and locked. When pulled to the right (as you can see in the next photo) the clamp loosens and the rim opens and you can detach the cake base and cake or dessert from the rim. 


The yellow arrow is pointing to a metal piece attaching the clamp hinge to the pan. 


In order to fix the pan all you need to do, is, use a set of flat nose pliers and bend the metal piece to the left, thus strengthening the clamp lock to its previous abilities. 


This are a couple of photos of the fixed pan! you can see how the silver handle is pressed against the side of the cake rim.


And another view from the top: 


My beloved springform pan is as good as new! 
If you found a great way to fix a baking appliance, tell me about it and I'll be happy to share it on my blog ! 

Happy Caking!


Tuesday, August 9, 2011

All things chocolate! Part 2

Have you ever slept in a room created from chocolate??? With a chocolate mosaic wall and chocolate furniture? 
Well, Godiva created one for a contest:

Godiva created the most amazing chocolate paradise! a room filled with all of a chocolate-lover’s dream, in the the Bryant Park Hotel NY.


The creating included: a full-walled mosaic compose of  chocolates, chocolate artworks were hang on the walls, and two huge chocolate statues were placed in the dining room. The rest of the room was decorated with  more chocolate treats.


This was a prize by Godiva for their annuel Valentine’s Day sweepstakes. The winners of this prize will enjoy the one in a life time suite

And here is a video of the suite!:


I found a lot of other stuff made of chocolate, but I thought that you might find the next idea as really easy, cool and fun to do, and there is also a tutorial! on how to create- Mini chocolate hamburgers!

So, how can you make these mini chocolate hamburgers?
For the burgers:
use chocolate discs (dark or milk)

For the buns:
make these cookies:
7 ounces of butter, at room temp.
5.3 ounces sifted flour
5.3 ounces cup sifted white cornflour
1 teaspoon of baking powder
3.5 ounces of confectioner’s sugar
1 teaspoon vanilla extract

Place in a mixing bowl the butter, confectioner’s sugar and vanilla extract and beat for several minutes using the flat beater, until you reach a smooth cream.
Gradually add the flour, cornflour and baking powder and mix until combined.
Place the dough in the refrigerator for 30 minutes.
Turn on the oven to 350 F/175 C

Create balls from cookie dough, for ½ of the balls make sure the ball isn’t wider than the chocolate discs; flatten them just a bit. For the second half, use just half the amount of cookie dough and flatten the ball to create a round disc. Thus creating 2 parts of the bun, top and bottom.
Both cookie types should be about the same diameter, and just a tad larger than the chocolate discs.

Brush the cookies that are rounded on top, lightly with egg white; spread some sesame seeds on each one.

Line a baking pan with parchment paper.
Place a flat cookie, a chocolate disc on top of it and a rounded dome shaped cookie on top of the chocolate.
Bake for 10-12 minutes, be careful not to burn the cookies!, let cool fully and enjoy your chocolate maple mini burgers!


I hope you enjoyed me summer glimps to the chocolate dreams in this world

Til next time
Cake away


Sharon

Tuesday, August 2, 2011

All things chocolate! first part (because I couldn't choose!)

I'm gonna make a statment I'm pretty sure you'll be able to relate to:

I LOVE CHOCOLATE!
That's why, today I brought you a gift! the most amazing things created in chocolate.
Sit back and enjoy the ride:


First come the shoes and bags, they are so beautiful and I really like the sets of items.
Frances Cooley a chocolatier and owner of Choc Chic creates fabulous stiletto shoes and handbags out of Belgian chocolate.
Frances Cooley


I'll take this one! thank you


And a matching pair of shoes! great


Next are these AMAZING dresses created for the Salon Du Chocolate- an annual exhibit held at Paris.

I was very lucky to visit this exhibit with my husband on our honeymoon almost 15 years ago. It was amazing, an Eiffel tower from chocolate activated as a chocolate fountain, a candy machine throwing candies at you at high speed and kids collecting them using their shirts as bowls, beautiful and tasty chocolate acorns, chocolate branches, tasting the coca fruit pulp, it was so good I still remember its flavor, unbelievable! 

Check out the NY chocolate fashion show:


Cadbury Chocolate Couture Collection Fashion Show:


If you want to visit the great wall of china but enjoy an easy trip, this is the way to do it:

I found a lot of other stuff made of chocolate,but I don't want you to have too much at once, you know the saying.. good things come in small packages.


Til next time,
Cake away
Sharon


Monday, August 1, 2011

Remember The Puzzle cake?

If you haven't seen it yet, this is it!

I've been decorating cakes for many years, (over 15 as a hobby and over 6 as a business) I must say that I have the most amazing customers! (mainly brides, and sometimes the bride's moms)
Most of them call me a few days after the wedding, or drop a line to tell me how great their wedding cake was.

That really makes me happy,  I gotta tell you, even after sooo many cakes, I always have the jitters and never truly relax until I know everything went well. (hubby, that's why I have so much white hair!)

Once in a while, I get really fun reviews that are even more exciting than usual!
I got one of those today ! yeh-y!
I felt like sharing, it with you, if you decorate cakes, cookies or occupay in any business that involves working with people, I'm sure you can relate.

so, here goes:

"Dear Sharon,
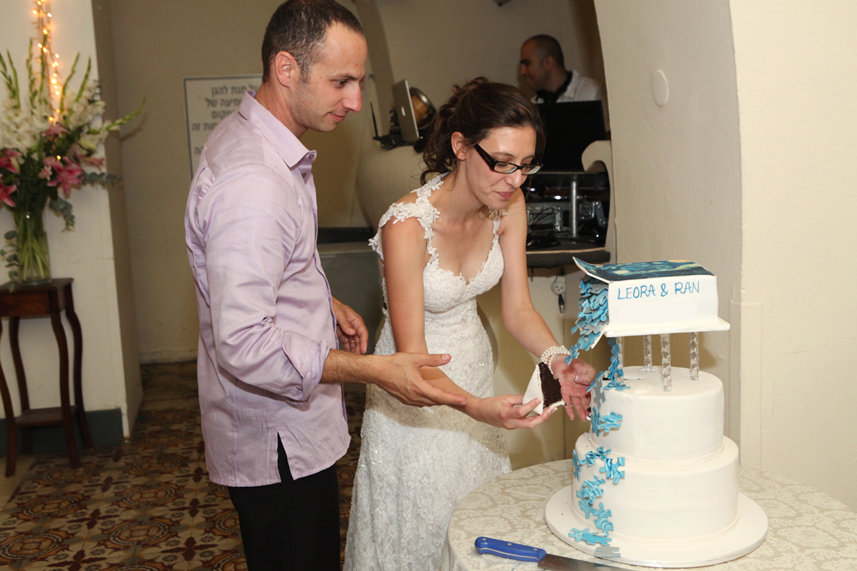
I am sending you two photographs of Leora and Ran with the wonderful wedding cake you made for them!

Everyone who tasted it said how good it was.

It also looked fantastic and turned out exactly as we discussed beforehand.

I would heartily recommend your cakes to anyone who wants something original, impressive, and tasty. 
So thank you.

Sincerely,

Hedva Rechtman"
Leora & Ran about to cut their wedding cake

Til' next time
Cake away!
Sharon

Wednesday, July 27, 2011

Summer Times...

Hey there, I really really wanted to publish a post on a celebrity wedding cake I did last week, but summer flu had me and I was spending my time not thinking about any type of food...

So I will tell you all about it in the next few days, but right now here is my latest creation- a cute bucket and rake cake, made yesterday for his kindergarten end of the year party.

I haven't really told the teacher what I do for a living, thus elegently avoiding special requests all throught the year...even his birthday cake was very simple, I only used edible paper -pooh drawing, because the next day he had a cute birthday cake for his party at home.

Well, the teacher, oblivient to my primary love (yaha, after my hubby and kids of course..) asked us to bring to the party a vegtable platter and 3 soft drink bottles
I love vegetables and was quite content with the request, but I didn't count on my baby boy (3.5 yrs) expectations-
"mommy, I want you to make a cake for the party!".
"Honey, I can't your teacher asked for vegetables and drinks!"
"I want a cake!!!!" ( he wasn't screaming, he's a very sweet kid he hardly raises his voice)
"well, let me see if that's possible"
"If I can make a cake, what shall it be?"
"I want a sand bucket and a spoon, with lots of sand and seashells!"

Well, he knows what he wants, you have to give him that..
I arranged a switch with one of the moms and peace returned to our home.


So, how was this cake created?
Since I started working on the cake around noon, I didn't have the time to create a tutorial, but I will walk you through the steps:

The sand is actually edible sand and very easy to make.
The cake is created from 4 layers of cake about 7" / 18 cm diameter.

I added ganache between the layers and on the top.

Then I placed on top of the cake a circle I cut from paper, it was 5" / 13cm diameter. It was my guide to cut the top 2 levels diagonally, all around, to create a sand bucket look.
once it looked like an upside down bucket I ganached the sides of all 4 layers.

I then rolled out pink sugarpaste and coverd the cake.
When covering a cake as tall as this, and especially when the cake is wider at the bottom, you will encounter some difficulty with access sugarpaste.
There are a few ways to manage this-
1. cut a slit in the paste once it is placed on the cake and set aside the access sugarpaste.
2. keep on opening the paste when it wrinkles and smooth it out as much as possible.
The second option was what I did. (it leaves less of an impression on the final cake.

I let the cake set for about 20 minutes and then flipped it over with a wide pizza spatula, directly on to the board, on a dab of royal icing. The cake was placed at its final location.
I then added cmc to some of the pink sugarpaste and let it stand for 15minutes. Then I rolled it out and cut a long strip , which I attached to the side of the bucket, at the top.
I paced the strip about 1/4" / 1cm higher from the cake sides, thus creating a border, where I could later add the edible sand and avoid any spillage.

Then I created the sand bucket handle from a white strip of gumpaste I attached with royal icing to the cake and added two toothpicks, one on each side. on top of each toothpick I placed a piece of pink sugarpaste.

While waiting for the cakes to bake, I created the spoon and the rake:
the spoon was really easy because it is just a handle with a hole at the end. I rolled out green sugarpaste with cmc and created a long skinny sausage. I then inserted a skewer almost all the way to top. For my step before last I flattened the sugarpaste using a cake smoother.
I used a small cutter to cut out a hole at the end of the handle and placed it on baking paper to dry.

For the rake I created the handle just like I did for the spoon. The more difficult part was the teeth. So I took a photo from the web of a real plastic rake that seemed as a good model and followed the look, first I cut it out flat, to create a similar look, and then I used a tool created for clay work. I find that you can never have too many types of tools while decorating cakes. When I see a tool that seems it will come in handy one day, I will usually buy it.  Sure, I have my share of unused tools, but once in a while I'm grateful, I have the unique tools that will help me out in that tight spot.


Keeping my  sugarpaste flat, I used the clay tool to create the teeth.
Then I bended them, stuck in each tooth a short flower wire, used a skewer to create a canal for the skewer to be added later, and let it dry against a flat surface, just to make sure the teeth are all aligned.
Final step using some royal icing as glue, I attached the rake body to the handle and let dry for a few hours.

The rake actually worked!


I created the seashells using 2 different chocolate molds. Although the shells were also sugarpaste with cmc.

Assembling the cake:
I spread edible sand on the board and in the sand bucket. Then I placed the spoon handle and the rake, actually using it to create markings in the sand!
Finally I added the seashells and was rather happy of the outcome. (my son was thrilled!|)
But it felt like something was missing...

A MESSAGE IN THE SAND!!!

It says in hebrew, have a nice vacation!

Have a great summer everyone!


Til next time,
Cake away
Sharon
 

Cake Decorating Blog Copyright 2009 Sweet Cupcake Designed by Ipiet Templates Image by Tadpole's Notez