Wednesday, November 20, 2013

Gumpaste Vs. Sugarpaste

As you might know I teach cake decorating classes in one of the leading cooking schools in Israel. 
In my basic course the second meeting involves sculpting a woman. 

I׳ve been teaching this course for quite some time and I always use Gumpaste for sculpting, just as I do for my own cake figures and decorations.

 However, no matter how much I stress the superiority of Gumpaste over Sugarpaste, for sculpting, designing and delicate intricate work, I always get the same question from my students, can't I use Sugarpaste in another method or form?

Well for starters you can use whatever you want, but if you want a good looking figure, a delicate flower or intricate lace pieces, I truly recommend using Gumpaste. 

If you are not familiar with the difference between the two pastes, here is my explanation: 

I compare Sugarpaste to a farmer:  he works long and hard, he does rough tasks, that must be done properly but without too much attention to delicacy or design. 


Gumpaste is similar to a royal family member. They are very delicate, they wear lace and silks and diamonds. They are all about beauty and design. They want perfect accuracy and decorations. 

If you keep that in mind you can understand the difference between the two.

One of my wedding cakes,
the decor and couple are made of
gumpaste


Sugarpaste for cake covering and Gumpaste for decor and sculpting.


That is all good and dandy, but I do have one exception I tell my students: What if you want to sculpt or create sugar flowers, you don't have Gumpaste and you have no desire to go to the store, or you can't go because your snowed in or just too tired?


We'll this consists as an emergency in my book :) 
In this case you can add some Gum tragacanth, Taylose, or CMC. These are powders used to stiffen your paste while adding a stretch quality to it. 
Add 1-2 tea spoons of any one of these powders to your Sugarpaste , knead well and let sit for 30 minutes to 1 hour, prior to using.
The paste will be stiffer than regular Sugarpaste, thus fitting for basic design work. 
But, this paste will never have the same qualities Gumpaste has. 
That is why I recommend having Gumpaste or making your own. 

Here is A very good Gumpaste recipe I use for my sugar flowers:

Alan Dunn's Gumpaste recipe

5 tsp cold water,
2 tsp powdered gelatine,
18 oz confectioners' sugar (sifted)
3 tsp gum tragacanth
2 tsp liquid glucose,
3 tsp white vegetable fat plus an extra tsp to be added later
1 large fresh egg white 

Mix the water and gelatine in a small bowl and leave to stand for 30mins. Sift the icing sugar and gum tragacanth together into the bowl of your heavy duty mixer. 

Place the gelatine/water mix over a pan of hot water and stir till the gelatine has dissolved. 
Add the glucose and vegetable fat to the gelatine and water mixture and keep heating until everything has dissolved. Add this mixture to the icing sugar and egg white and start beating in the lowest speed then slowly turn the speed up to high till the paste is stringy and white. 
Take the paste from the bowl and knead together. Cover using the extra tsp of vegetable fat to stop it crusting and place in a plastic bag inside an airtight container. 
Let the paste rest for 12 hrs before using.
Keep in the fridge.

I'd love to see your cake designs!
if you send me good qulity photos i'll portray it in the blog!

Till next time, cake away!'

Sharon

Wednesday, November 13, 2013

sculpting with food

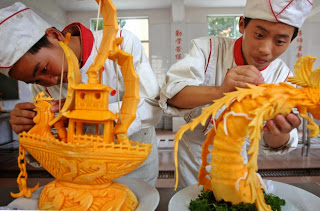
It is no secret that sculpting with gum paste, fondant or candy clay is sculpting with food. 

But these media all follow the same guidelines - kneading some of the material at hand then transforming it into a new object, from flowers to animals to people. 

I've been using these media for over 15 years, and I love working with them, but I'm always fascinated when I see other food used to create one of a kind sculptures. 

Such as cheese: 


http://www.toxel.com/inspiration/2009/10/13/15-amazing-cheese-sculptures/
Hey Bob!

http://www.toxel.com/inspiration/2009/10/13/15-amazing-cheese-sculptures/
:)

 
Butter: 


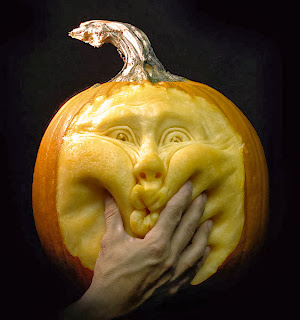
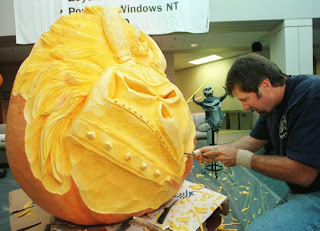
Pumpkin carving:


http://www.ibtimes.com/pumpkin-carving-patterns-here-are-few-ideas-708922
Soo cool!

http://www.ibtimes.com/pumpkin-carving-patterns-here-are-few-ideas-708922
artist at work

WOW


Or mosaic candy portraits:
http://www.delish.com/food-fun/food-art#slide-1
Guess who?


who Am I ?
I always admire this type of art work, because I find it much more challenging to create a figure by carving. You need to imagine each part of your subject and you can't go wrong. Or replace what you've already carved...
In art pictures created from candy, you have to spend quite some time arrainging the colors correctly with ready made pieces. That seems like a real hassle.


Yesterday I visited the 30th annual International Exhibition for Food and Beverage. 
I enjoyed it as in previous years, but it was the first time I had a chance to see up-close the work of a chef that is also a sculptor, Shimon Ben ami. He sculpts in Margarine! 


Mostly he had photos portraying his work, but I didn't take any of them due to their quility. However, he also had a great sculpture of Shimon Peres the Israeli President

In the following photo you can see the sculpture the sculptor and the photo of Shimon Peres. 

shimon & Shimon 


The resemblance is amazing. I really looked the way he handles the Margarine. He didn't smooth it as you would regularly see in other works created from Margarine or Butter, he gave it a rough look, similar to bronze sculptures. 
Do you sculpt in food other then the sugar collection?


Tuesday, November 5, 2013

How to fix a broken springform cake pan

About a month ago I hosted Rosh Hashanah at my house. 
Dinner went well, everyone enjoyed the meal, and we had a lovely time.  

Next, it was cake time! For this special occasion I baked a great honey spiced cake in one of my springform pans.  

If you don't know what I'm talking about, you should check them out. These pans are great for cakes and desserts that are prone to fall apart when removed from regular cake pans. The springform pans have a special feature: the rim loosens from the base of the pan when you open the clamp.  You can't imagine how useful this is. I regularly bake in these pans, remove the rim and display my cakes on a nice serving platter or cake stand, thus avoiding all the mess and possible problems involved in removing a cake from a cake pan. Finally, if you have cake leftovers, you can reattach the rim to the base, cover the pan with and replace it in your fridge. It's a really great feature!By the way, some of the pans come with two different bases, for use as a tube pan or a regular round cake pan.  

If you don't have a springform cake pan I recommend adding one to your kitchen for delicate cakes, such as chocolate mousse cakes and cheese cakes, or as I use them for . As I was pulling it out of the fridge, it hit the fridge door and got a small dent on the top of the pan. I was a little upset, because I really like that pan, but I didn't give it much thought. After I served the cake I had some cake left and was planning on closing the rim back, and placing the cake in the fridge. To my dismay the pan didn't lock itself when I closed the clamp! 

Lucky for me I have a very handy Dad that was happy to take the pan with the rest of the cake to fix it for me!  Lucky for you :) he took photos of the very simple and quick process in case your springform pan ceases to function.

So how do you fix a springform cake pan? 

In the photo below you can see my springform pan. The long silver handle is the clamp handle. When pressed all the way to the left, the rim is closed and locked. When pulled to the right (as you can see in the next photo) the clamp loosens and the rim opens and you can detach the cake base and cake or dessert from the rim. 


The yellow arrow is pointing to a metal piece attaching the clamp hinge to the pan. 


In order to fix the pan all you need to do, is, use a set of flat nose pliers and bend the metal piece to the left, thus strengthening the clamp lock to its previous abilities. 


This are a couple of photos of the fixed pan! you can see how the silver handle is pressed against the side of the cake rim.


And another view from the top: 


My beloved springform pan is as good as new! 
If you found a great way to fix a baking appliance, tell me about it and I'll be happy to share it on my blog ! 

Happy Caking!


Cake Decorating Blog Copyright 2009 Sweet Cupcake Designed by Ipiet Templates Image by Tadpole's Notez